To install IPTV on OTT Navigator, install the app from the Google Play Store (or through the Aptoide TV store on Fire TV), open it, press “Add playlist,” then connect your source with an M3U link or Xtream Codes credentials; the app then loads your channels, guide, and catch-up in about five minutes. That is the summary; the full step-by-step, button by button, follows immediately.
OTT Navigator is one of the most complete IPTV players on Android, Android TV, and Fire TV. It provides no channels of its own, it is a player, much like a web browser is for websites, but it turns the source you give it, such as an IPTV subscription, into a real television interface, with a program grid, favorites, catch-up of past shows, and fine-grained settings.
This guide walks you through installation on each device, setting up your source, the settings that improve the experience, and fixes for the most common issues. It also answers the two questions people really ask before installing: is it safe, and why can’t it always be found in the app store?
What you need before you start
Before installing anything, gather these few things. The great majority of failed installs stumble on a missing detail here, not on the app itself.
- A compatible device: an Android phone or tablet, an Android TV box or TV, or a Fire TV device.
- Your Xtream Codes credentials (server URL with its port, username, password) or your full M3U link.
- Your program guide (EPG / XMLTV) link, if your source provides one separately.
- A stable internet connection, 25 Mbps is enough for HD, closer to 50 Mbps for 4K.
- A legitimate, authorized content source behind those credentials.
Install on Android or Android TV
From the home screen, open the Google Play Store.
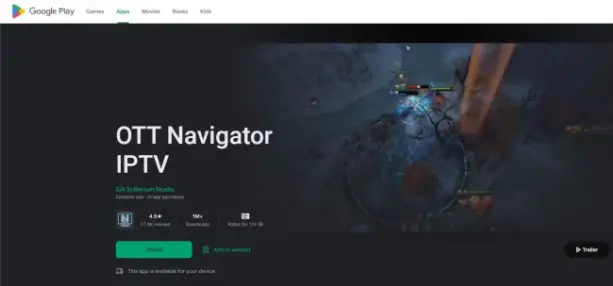
Select the search bar and type “OTT Navigator IPTV.”
Check that the publisher is correct, then press “Install.”
Wait for the download to finish, then press “Open.”
Choose the interface language if the app asks.
Tick the license agreement (EULA) box, then press “Continue” or “Accept.”
Grant the permissions (storage, network) by pressing “Allow.”
On the home screen, press “ Live Stream“.
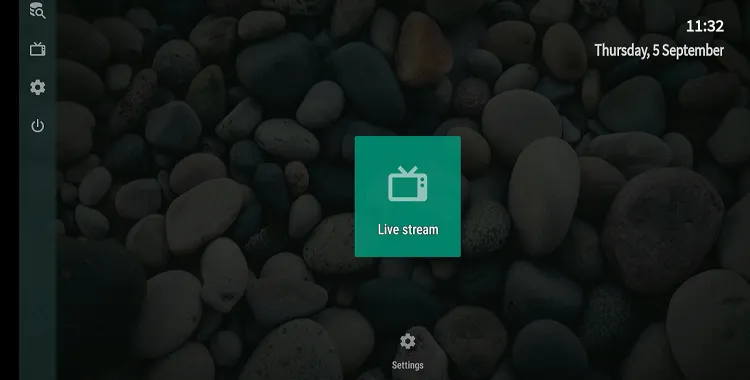
Choose “Configure Provider“
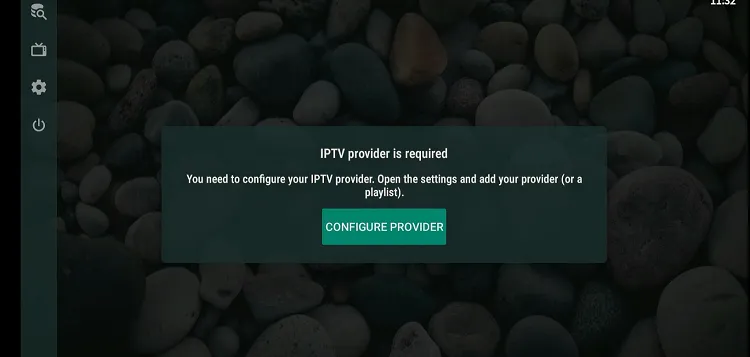
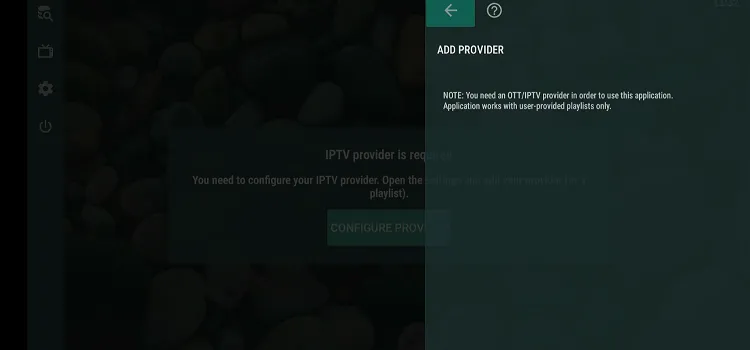
Click on Add Provider
Choose “Playlist“
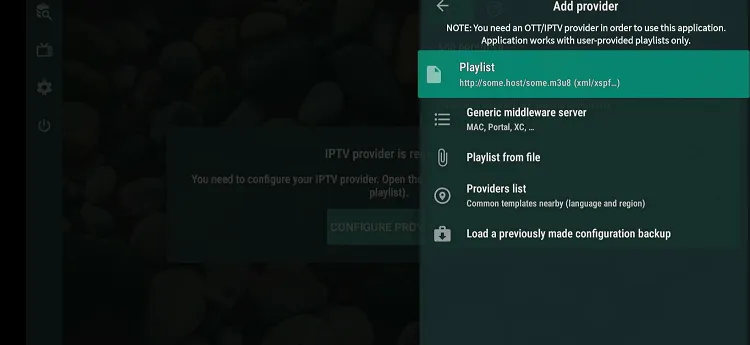
Choose the method: “Xtream Codes” or “M3U playlist.”
For Xtream Codes: enter a name, the server URL with its port (e.g. http://server:8080), your username, and your password.
For M3U: enter a name and paste your M3U link (it starts with http:// or https://).
(Optional) add the EPG URL in the field provided if your source offers one separately.
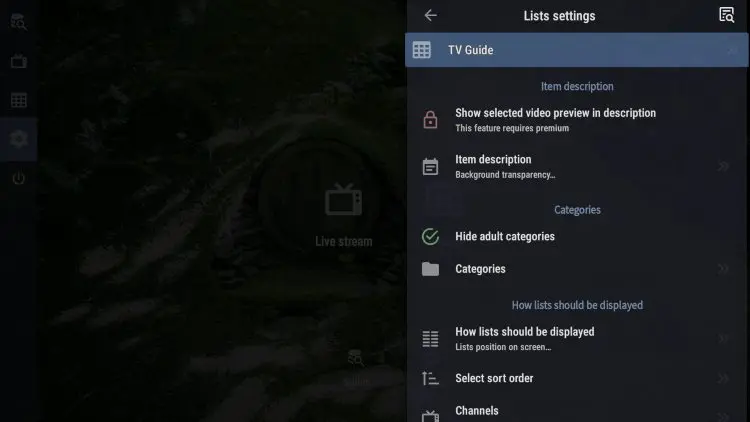
Press “Save” or “Next” — the app then imports your channels.
Install on Fire TV (via Aptoide TV)
OTT Navigator is not in the Amazon Appstore: on Fire TV, it installs through a third-party store, Aptoide TV, which you set up first. The process looks long, but each step is simple.
First, allow third-party apps:
From the home screen, open Settings → My Fire TV
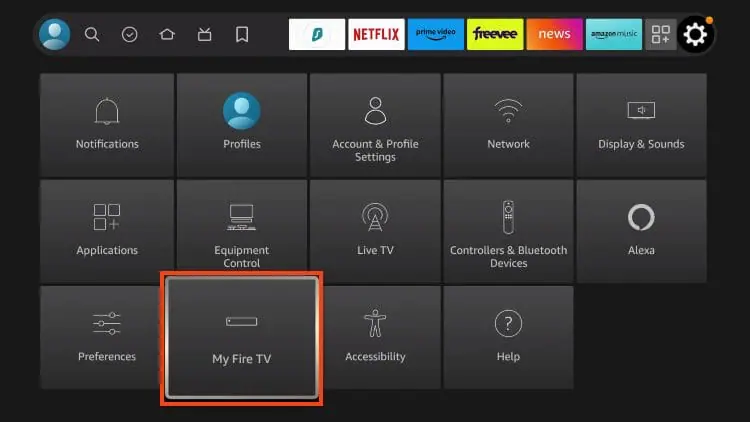
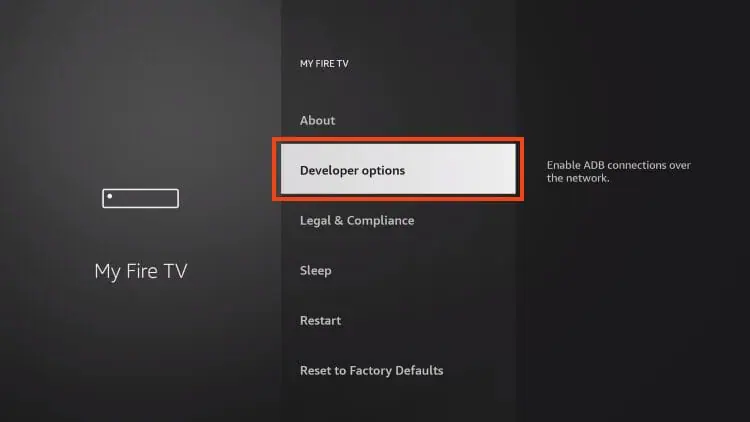
→ Developer Options.
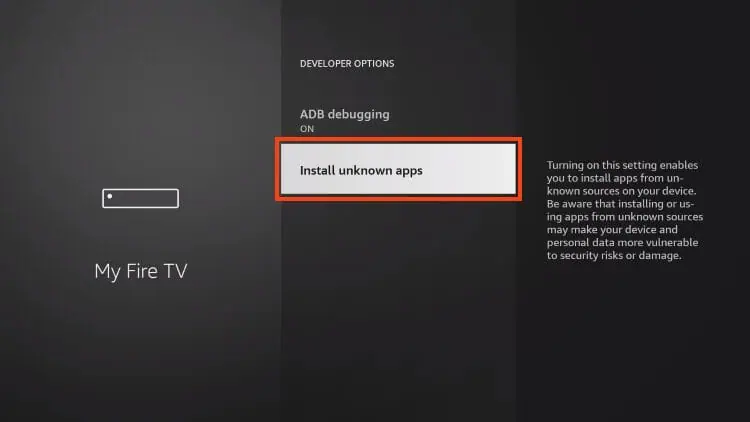
Select “Install Unknown Apps.”
(If “Developer Options” is missing: Settings → My Fire TV → About, land on your device name and press the center button 7 times to unlock the menu.)
Next, install the Downloader tool:
Return to the home screen, select the search magnifier, type “Downloader,” and choose the orange-icon app.
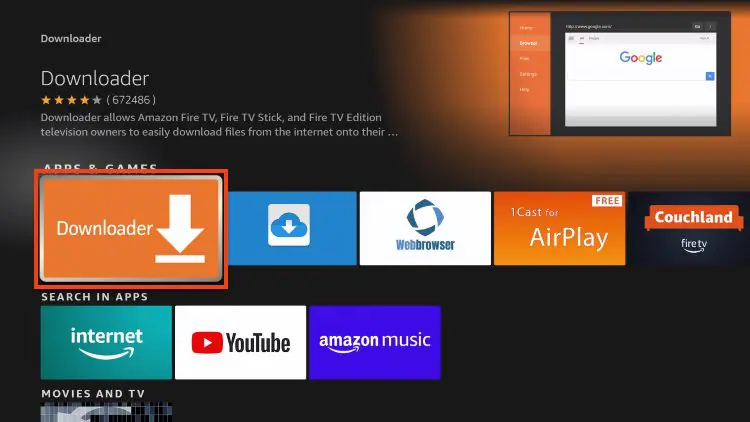
Press “Get,” wait for it to install, then allow file access on opening.
Go back to “Install Unknown Apps” and enable the permission for Downloader.
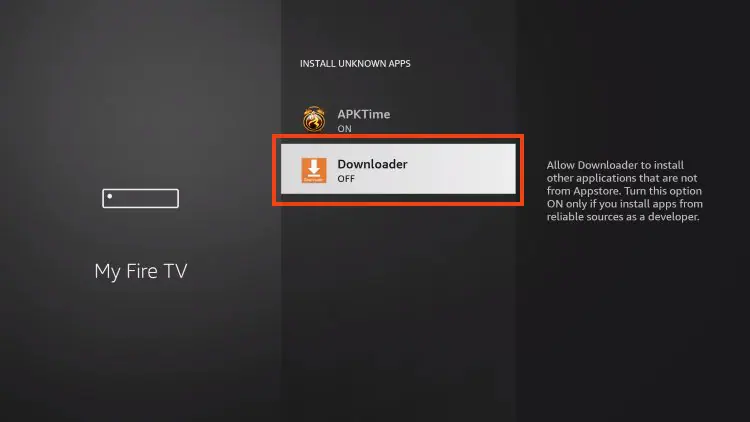
Then install Aptoide TV:
Open Downloader, go to the address field, enter the official Aptoide TV file address, and press “Go.”
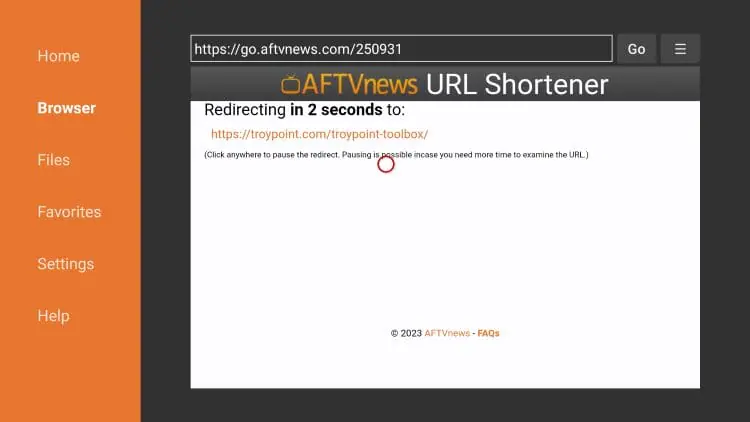
After the download, press “Install,”
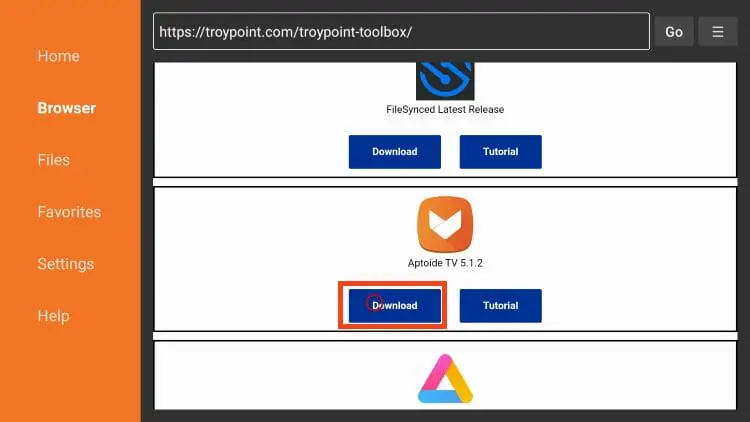
“Done,” then “Delete” twice to remove the file.
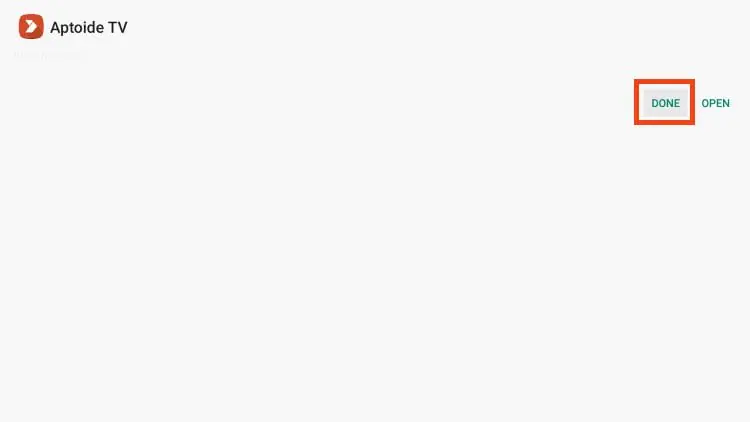
Go back to “Install Unknown Apps” and enable the permission for Aptoide TV as well.
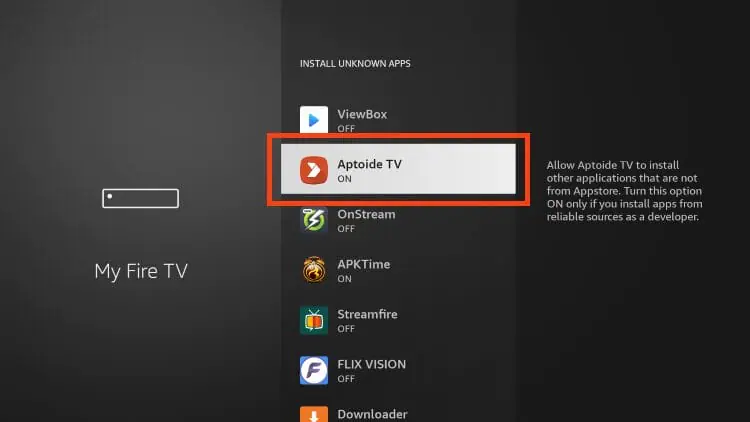
Finally, install OTT Navigator:
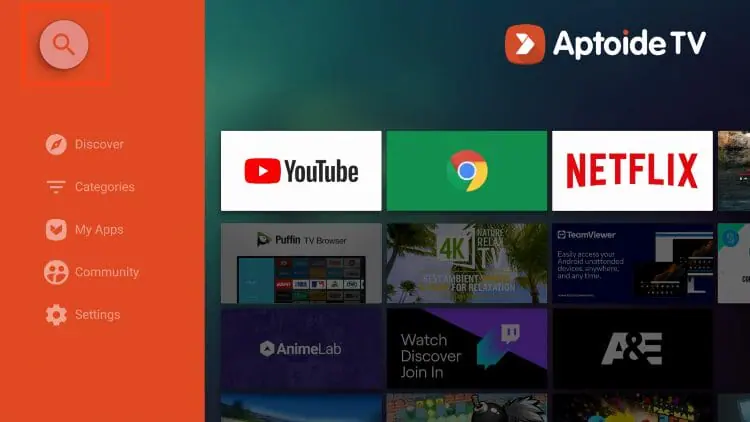
Open Aptoide TV and press the search icon in the top left.
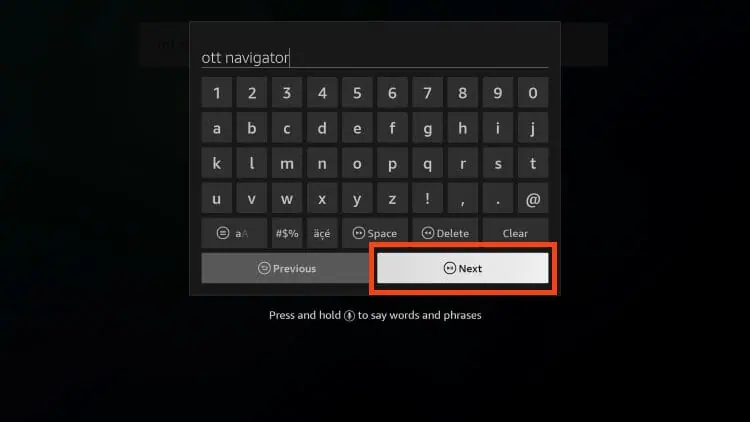
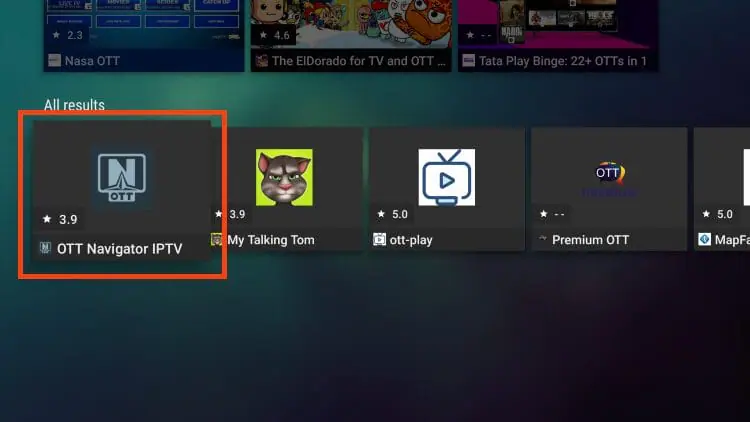
Type “OTT Navigator” and select the app in the results.
Press “Install,” wait, then open the app.
Now follow steps 5 to 12 from the Android section (language, license, permissions, add playlist).
Two mistakes block almost every failed login: forgetting the port after the colon (often :8080) and getting a capital letter wrong in the username or password. Copy them character by character.
How to log in and set up the EPG and subtitles
Once the app is open, everything starts from the home screen. Here is how to log in, show the guide, and manage subtitles.
Log in from the first page:
On the home screen, press “Live Stream” (or the “+” icon).
Choose “Configure Provider“
Click on Playlist
Enter your details (server URL with port, credentials, or M3U link), then confirm.
Your source appears in the list: select it to enter, or press “+” to add another.
Show the program guide (EPG):
Open the “Live” section from the side menu.
The current program shows beside each channel; open the grid view to scroll through the schedule.
If the guide is empty, go to Settings → EPG and add your source’s XMLTV URL, then refresh.
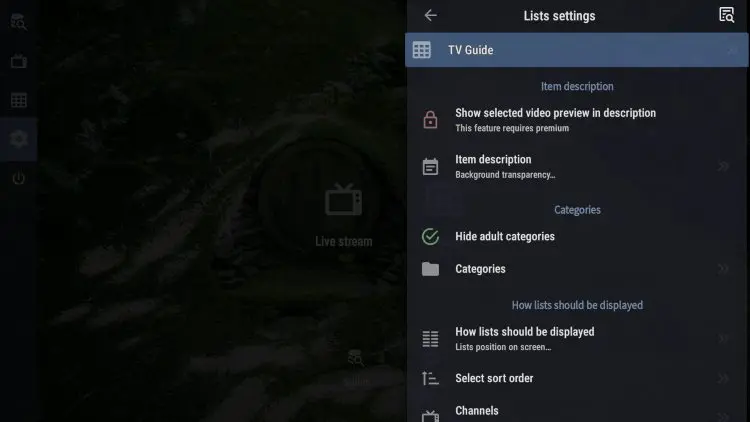
Fix the time zone in the settings if the times are off.
Manage subtitles and audio:
- Start a channel or program.
- Show the on-screen controls with a press (or tap).
- Press the subtitles icon to choose a track or turn them off.
- Press the audio icon to switch language if several are available.
Note: subtitles and audio tracks only appear if the channel or program actually offers them — their presence depends on the broadcaster, not the app.
To change subtitles or switch the audio language in more detail, open any stream and bring up the playback controls, then look for the speech-bubble (subtitles) and the audio/speaker icons. Tapping the subtitles icon lists every subtitle track embedded in that stream, so you can pick a language, switch between them, or turn subtitles off entirely; some sources also let you load an external subtitle file from your device.
Tapping the audio icon does the same for sound: if the channel or program is broadcast with more than one audio track, for example an original-language track and a dubbed one, you select the language you want from the list.
If only one option shows, the stream simply carries a single track, and no setting in OTT Navigator can add one that the source does not provide. When subtitles or audio drift out of sync, OTT Navigator also offers a delay adjustment in the same controls to nudge them back into line.
How to change the video quality
Adjusting the picture quality lets you match playback to your connection, a lower setting stops buffering on a weak line, while a higher one gives the sharpest image when your bandwidth allows. OTT Navigator handles this in a few ways.
- During playback, open the on-screen controls and select the quality or settings icon.
- If your source offers the channel in several streams (for example FHD, HD, and SD), pick a lower one to reduce buffering, or a higher one for more detail.
- For a channel that stutters or will not start, open its options and switch the video engine, internal player, ExoPlayer, hardware decoder, or software decoder — until one plays cleanly.
- In the app’s settings, you can also raise the buffer so OTT Navigator loads more video ahead of time, which smooths out an unstable stream at the cost of a slightly slower start.
Keep in mind that the final quality is capped by what your source broadcasts: OTT Navigator can lower it or match it, but it cannot create detail the stream does not contain. If every channel looks soft, the limit is on the source side, not the app.
OTT Navigator: what is it, and who is it for?
OTT Navigator is an IPTV player for Android, Android TV, and Fire TV, known for its polished program guide, catch-up of past shows, and deep settings. It suits the user who wants more than a plain channel list: fine-grained favorites, multiple playlists, parental controls, display themes.
If you want the simplest possible app, it may not be the best fit; if you want power and an interface that feels like a real TV box, it is among the best in its class.
| Player | Platforms | Free version | Catch-up | Learning curve |
| OTT Navigator | Android, Android TV, Fire TV | Yes (premium option) | Yes | Medium |
| IPTV Smarters Pro | Almost all | Yes | Limited | Low |
| TiviMate | Android TV, Fire TV | Yes (premium option) | Yes | Medium |
| GSE Smart IPTV | Android, iOS | Yes | No | Low |
Free or premium: which to choose?
OTT Navigator comes in a free version and a paid premium one. The free version already covers the essentials: adding playlists, the program guide, favorites, and playback. Premium unlocks conveniences like more devices, certain advanced features, and the removal of limits on specific settings.
To start, the free version is plenty to judge whether the app suits you; move to premium only if you regularly use the features it reserves. Either way, this payment is for the app, never the content: OTT Navigator sells no channels.
Is OTT Navigator safe, and why can’t I find it in my store?
This is the most common question, and it deserves a straight answer. The app itself is a legitimate player; the risk comes not from it but from two pitfalls. First, availability varies by device and region. On Android and Android TV, OTT Navigator is on the Google Play Store, but it can be hidden depending on your country or TV model, which is why some cannot find it.
On Fire TV, it is simply not in the Amazon Appstore, so installation goes through Aptoide TV, as described above. Second, watch for copycats: several apps use a very similar name to ride its popularity. Install only the official publisher’s version, check the publisher name, and only get files from a trusted source to avoid a tampered one. That is the one precaution that really matters for security.
The settings that make a difference
Once your channels load, a few settings transform daily comfort. Start with catch-up (playback of past programs), one of OTT Navigator’s strengths: enable it in the playlist options if your source supports it, then hold the selection on a compatible channel to rewind in time. If the option stays greyed out, your source provides no archive, the app cannot help that.
Next, set up the guide (EPG): OTT Navigator often detects it automatically, but if it stays empty, add your source’s XMLTV URL in the settings and refresh, and fix the time zone if the times are off by an hour. Finally, handle organization: create a favorites list, hide categories you do not use, and turn on parental controls with a code if there are children in the home. You can also save several playlists and switch between them, handy when several people each have their own source.
Troubleshooting common issues
- A channel freezes or will not start: open the playback options and switch the video engine (internal, ExoPlayer, hardware or software decoder) until one works.
- Nothing loads after adding the playlist: recheck the server URL, port, and credentials, respecting capital letters, this is the number-one error.
- The guide is empty or off: add your source’s XMLTV URL, then fix the time zone.
- The interface is slow: clear the app’s cache and restart the device.
- Stuttering in 4K: switch to Ethernet, lower the resolution, or increase the buffer.
FAQ
Is OTT Navigator free?
The free version covers the essentials; a premium version unlocks extra options. The app stays separate from your content source.
Which devices does it run on?
Mainly Android, Android TV, and Fire TV. Installation goes through the Play Store on Android, and through Aptoide TV on Fire TV.
Does it work on iPhone or iPad?
Not directly: the iOS family uses a separate app. OTT Navigator targets Android and Fire TV.
Do I need a subscription to use it?
Yes, in the sense that the app provides no channels. You must connect a legitimate, authorized source that supplies your credentials.
Why doesn’t catch-up appear?
Because it depends on the source. If it offers no program archive, the option stays inactive even when ticked.
The guide won’t show — what do I do?
Give it a minute after the channels load. If it stays empty, add your source’s EPG/XMLTV URL, then fix the time zone if the times are off.
How do I change subtitles or the audio language?
Start a stream, bring up the playback controls, then use the subtitle icon to pick a language or turn subtitles off, and the audio icon to switch language. They appear only if the stream carries those tracks.
How do I change the video quality?
Open the on-screen controls and select a lower or higher stream if your source offers several, or switch the video engine (internal, ExoPlayer, hardware, or software) for a channel that stutters. A lower quality reduces buffering.
Conclusion
Installing IPTV on OTT Navigator is simple once the steps are followed in order: install the app from the Play Store (or Aptoide TV on Fire TV), accept the first-launch prompts, then add your playlist via an M3U link or Xtream Codes credentials.
The app then loads your channels, guide, and often catch-up, and all that is left is to organize your favorites and adjust a few settings. Its advanced features — a refined guide, playback of past shows, parental controls, themes — make it one of the most complete players in its class. Always keep in mind that the app is only a tool: the quality and legitimacy of your experience depend above all on the source you connect to and the stability of your connection.